
Written by
Connie Yang
Solved: Disk com.apple.DiskManagement.disenter Error 49180
Summary: Read this post to fix the hard drive not mounting on Mac - com.apple.DiskManagement.disenter error 49180. You can find the causes and solutions of this error here. By the way, since the hard drive is unmountable, rescue the data on it with iBoysoft Data Recovery for Mac to escape possible data loss in the future.
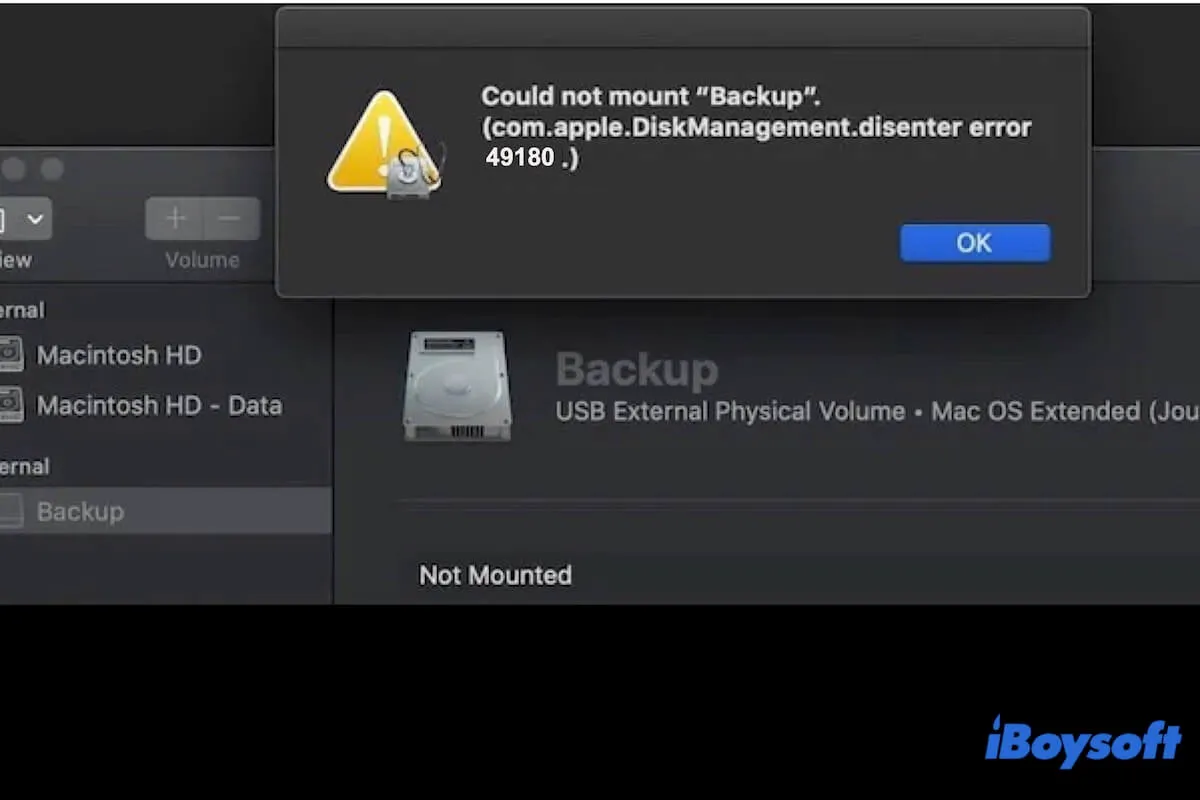
You go to Disk Utility to check your problematic hard drive and find the Mount button is grayed out. But you insist on clicking the Mount button to try manually mounting the disk, only to get the error message saying: com.apple.DiskManagement.disenter error 49180.
Here's a similar case from a user in Apple discussion:
After running Disk Utility First Aid to check my external hard drive, the drive automatically unmounted. When I click the Mount button in Disk Utility to mount it, the error "com.apple.DiskManagement.disenter error 49180" shows up. I can't access it anymore. Can the data on the external drive be rescued and saved to another drive?
What's the matter? This error means that your external hard drive not mounting on Mac. But don't worry, you can get the workarounds to fix the disk not mounting - com.apple.DiskManagement.disenter error 49180 from this article and learn about its causes.
Overview of the ways for solving com.apple.DiskManagement.disenter error 49180:
| Workarounds | Steps |
| Replug the external hard drive | 1. Right-click on the unmountable drive in Disk Utility or the desktop. 2. Choose Eject. 3. Wait a moment and replug the drive to your Mac. |
| Change a cable & try another USB port | 1. Connect the external hard drive to Mac with a new cable. 2. Try connecting the drive to another USB port on Mac. |
| Restart Mac | 1. Completely shut down your Mac. 2. Press the power button to turn on your Mac and meanwhile hit Option - Command - P - R for 20 seconds. 3. Release the key when seeing the startup screen appear twice. |
| Check the drive with First Aid | 1. Open Disk Utility. 2. Select the drive and click First Aid. |
| Use Terminal to mount the drive | 1. Check the disk's identifier in Disk Utility in the Device column. 2. Open Terminal and enter diskutil mount /dev/disk2s2. Replace disk2s2 with your disk's identifier. |
| Recover data and reformat the hard drive | 1. Free download iBoysoft Data Recovery for Mac to recover files from the unmountable drive. 2. Open Disk Utility. 3. Select the drive and click Erase. |
Free download iBoysoft Data Recovery for Mac to help you rescue data from the unmountable hard drive on Mac.
Share the methods to help more people who also encounter this problem.
Table of Contents:
- 1. Rescue data from the external hard drive not mounting on Mac
- 2. Why does com.apple.DiskManagement.disenter error 49180 appear?
- 3. How to fix com.apple.DiskManagement.disenter error 49180?
- 4. FAQs about com.apple.DiskManagement.disenter error 49180
Rescue data from the external hard drive not mounting on Mac
Since the external hard drive is not mounting on your Mac, you're recommended to recover files from the hard drive as a priority.
On the one hand, the unmountable drive may experience further corruption in the future, leading to it even not being detected and showing up in Disk Utility. If that happens, only the hard drive repair lab can help you repair the drive and get out the files. And that usually costs a lot.
On the other hand, the unmountable drive is caused by file format corruption to a large extent. In this case, you have to reformat the drive to make it mountable. But formatting a drive will erase all data on it and reduce the data recovery rate for even data recovery software.
So, get down to restoring data on the unmountable external hard drive with iBoysoft Data Recovery for Mac first. This data recovery program supports recovering data from corrupted, inaccessible, and unmounted SSDs, HDDs, USB drives, and other devices.
Here's how to use iBoysoft Data Recovery for Mac to recover data from the unmountable hard drive on Mac:
- Free download and install iBoysoft Data Recovery for Mac on your Mac.
- Launch the software and select the unmountable drive from the window.
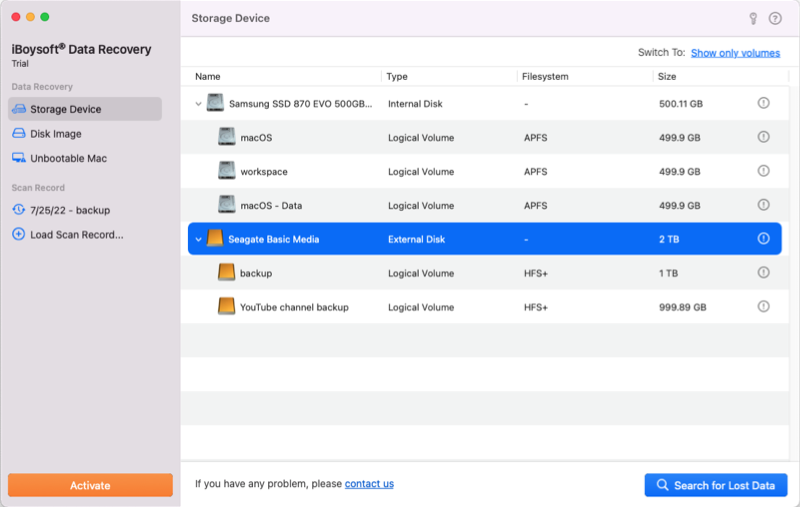
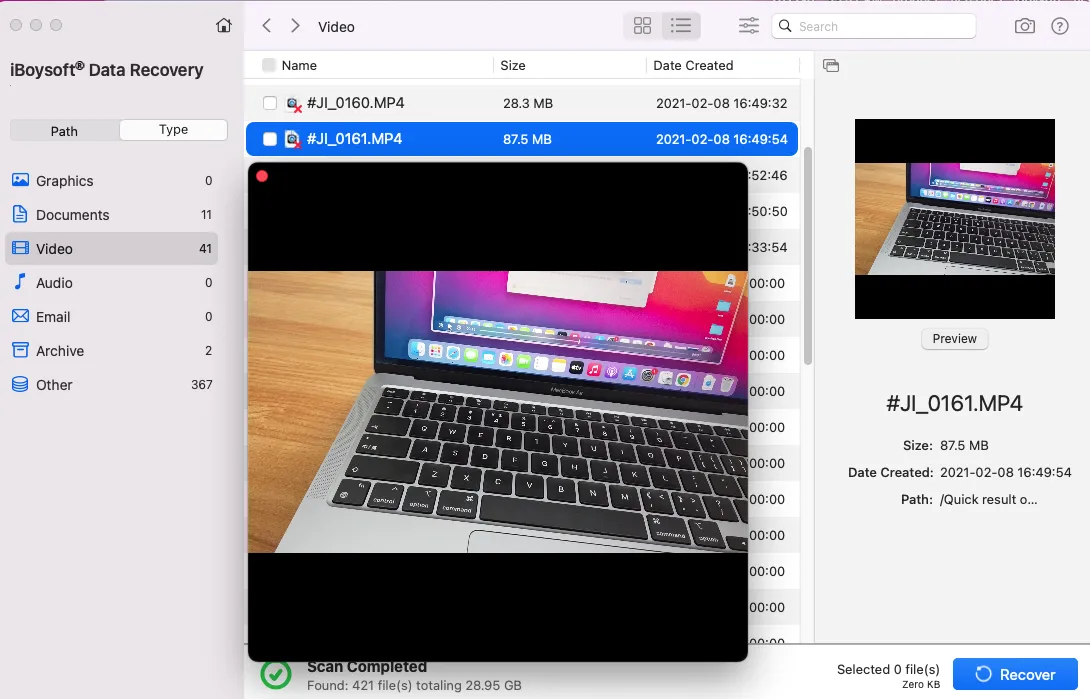
- Click "Search for Lost Data" and let it scan the files on the drive.
- Preview the scanning results and choose your want data, click "Recover" to save it to another external drive or to your Mac.
Share the way to help others recover data from the external hard drive that's not mounting on Mac.
Why does com.apple.DiskManagement.disenter error 49180 appear?
This com.apple.DiskManagement.disenter error 49180 is a hint to tell you that the hard drive can't be mounted on your Mac with the Mount feature in Disk Utility. And the causes that lead to the hard drive even can't be mounted by the built-in Disk Utility Mount function includes:
- Faulty communication between the external hard drive and Mac.
- The external hard drive is corrupted.
- System errors.
- Incompatible file system of the external drive.
- Software conflicts.
- Glitches from Paragon/Tuxera NTFS for Mac. (You can try iBoysoft NTFS for Mac which has high macOS compatibility)
How to fix com.apple.DiskManagement.disenter error 49180?
If you want to get rid of the disk not mounting 'com.apple.DiskManagement.disenter error 49180' issue and mount your drive to access the files on it, follow the methods in this part.
Replug the external hard drive
Perhaps, there're certain unknown errors that stop the system to mount and communicate with the external hard drive. You can safely eject the external drive and wait a moment, then replug the drive to your Mac.
Change a cable and try another port on Mac
Notably, a faulty cable and USB port can also block your external hard drive to be mounted on Mac. So, if you also change a cable and replug your drive to another port on your MacBook Pro, Mac Mini, or other models.
Restart your Mac
Restarting Mac can exclude the temporary system errors that cause com.apple.DiskManagement.disenter error 49180 and refresh macOS to let it auto-mount the drive again.
Reset NVRAM/PRAM
NVRAM (non-volatile random-access memory) or earlier PRAM stores the OS-related information to keep Intel-based Mac running properly. If your Mac feedback you the com.apple.DiskManagement.disenter error 49180 when it can't mount the drive with its Mount functionality, you can reset NVRAM to sweep away the possible corrupted NVRAM settings that cause this problem.
To reset NVRAM/PRAM on an Intel-powered Mac:
- Press the power button for seconds to completely shut down your Mac and wait a moment.
- Press the power to turn on your Mac and meanwhile press down the Option + Command + P + R keys for about 20 seconds.
- Release all the keys until you hear the second startup sound or the Apple logo shows up and disappears twice.
Run Disk Utility First Aid to check the unmountable drive
The First Aid feature in Disk Utility supports checking the file system errors on the drive and repairing tiny ones. It is worth noting that don't do other operations on the drive when First Aid is verifying it. Otherwise, your drive may corrupt. That is why some users say that their drives won't mount after running First Aid.
Here's how to use First Aid to check and fix the unmountable external hard drive:
- Open Disk Utility (Launchpad > Other).
- Click on the unmountable drive from the left sidebar.
- Click First Aid on the top toolbar > Run.
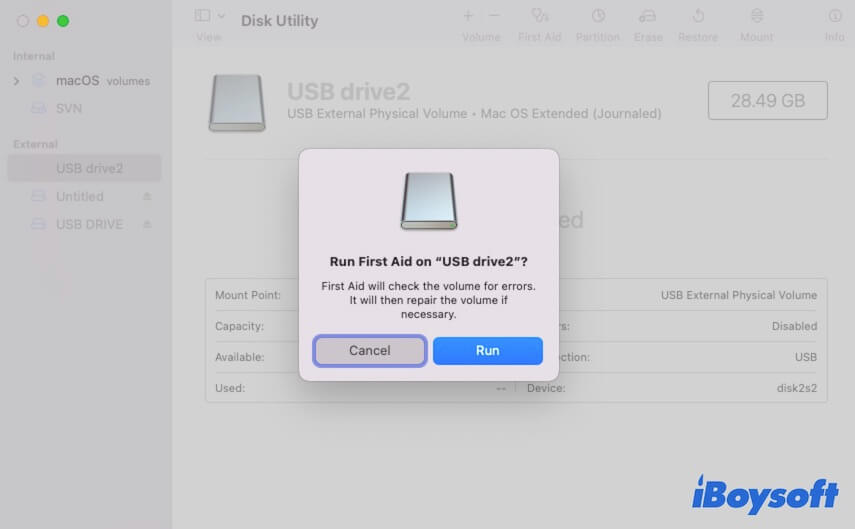
- Wait for First Aid to check and fix the drive.
After First Aid finishes checking, click the Unmount button in Disk Utility to mount the drive again.
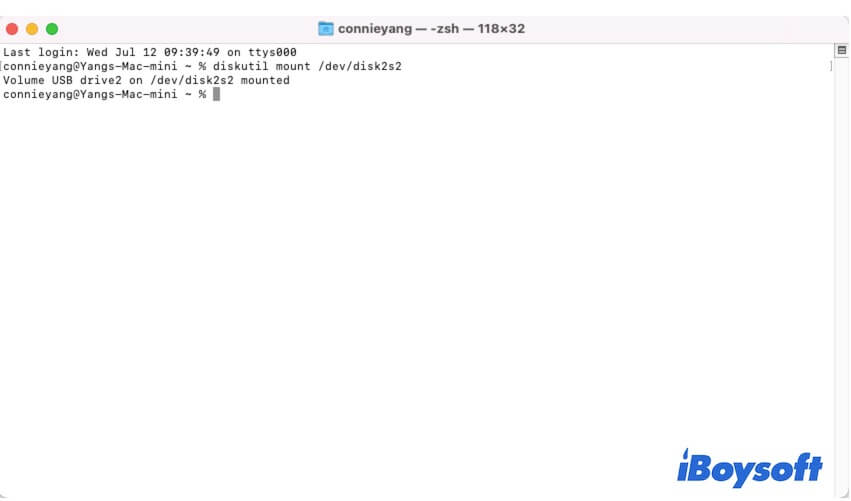
Use Terminal to force mount the drive
When the Mount function in Disk Utility is not working, you can run commands in Terminal to force mount the drive.
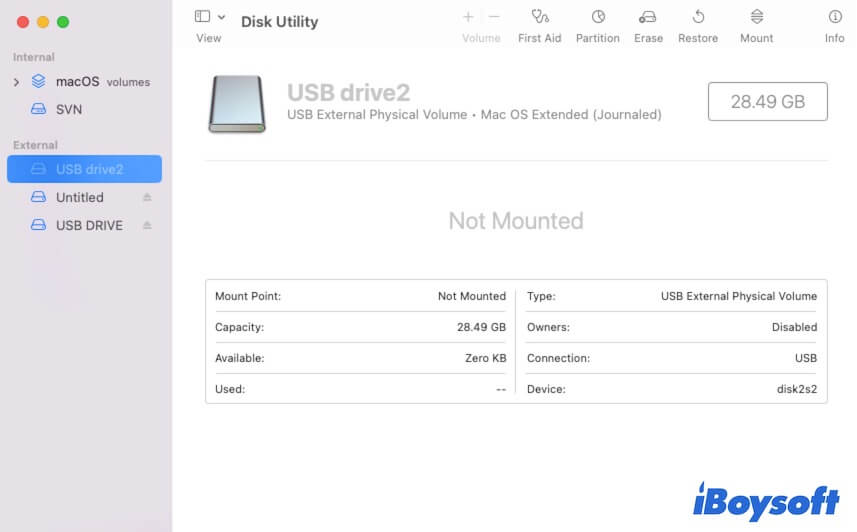
- Find out the unmountable drive's identifier. Open Disk Utility and click on the unmountable from the left sidebar. Then, you'll find its identifier in the Device column.
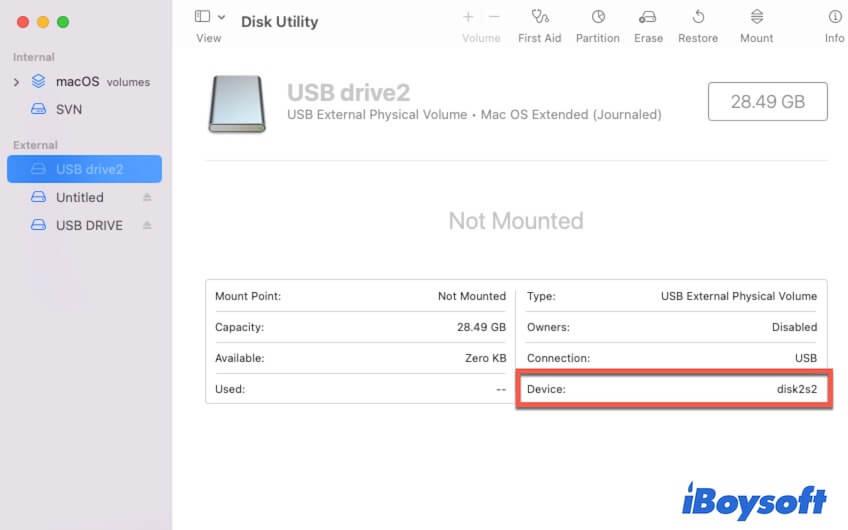
- Open Launchpad > Other > Terminal.
- Enter the command below to mount the external hard drive. You need to replace disk2s2 with your unmountable drive's identifier. Then, press Return. diskutil mount /dev/disk2s2
Reformat the unmountable external hard drive
If the above ways fail to fix the com.apple.DiskManagement.disenter error 49180 and mount the external hard drive, it can exclude that the external drive is already corrupted. In that case, you need to format the corrupted external drive to make it workable and mountable.
But it is worth noting that, formatting a hard drive will erase all data on it. So, if you don't want to lose your documents, videos, photos, or other files on the drive, you can use iBoysoft Data Recovery for Mac to rescue your data. Only a data recovery tool can get files off a corrupted and unmountable hard drive.
After data recovery, you can get about formatting the external hard drive on your Mac.
- Open Disk Utility and select the unmountable drive from the sidebar.
- Click Erase.
- Set a name for the drive and choose a format for it.
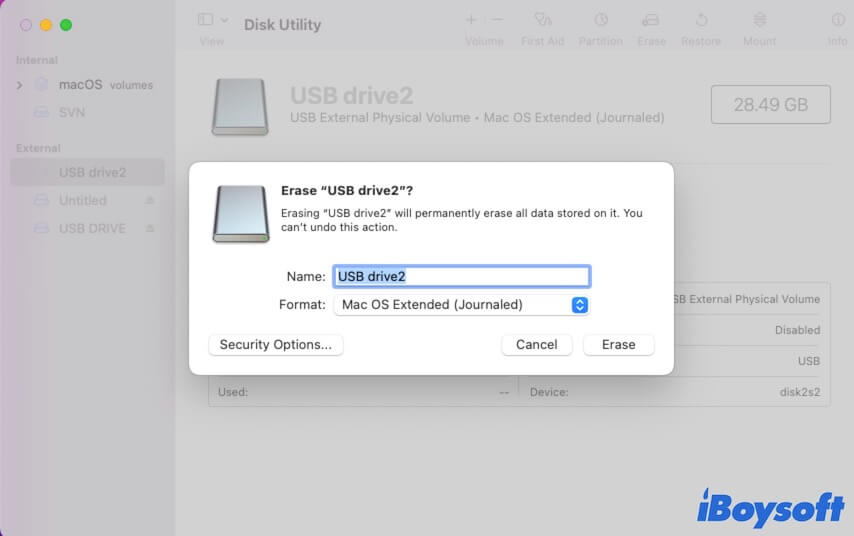
- Click Erase.
If you think this post helps you solve the problem, tell more people.
FAQs about com.apple.DiskManagement.disenter error 49180
A
To fix a hard drive that won't mount on Mac, you can follow these ways:
Reconnect the hard drive to your Mac.
Run First Aid to check and repair the hard drive.
Run diskutil mount /dev/disk2s2 in Terminal to mount the hard drive. Replace disk2s2 with the identifier of your hard drive, which can be found in the Device: column in Disk Utility.
Recover data from the unmountable drive with iBoysoft Data Recovery and then format it.
A
To force mount an external hard drive, you can click the Mount button in Disk Utility. Or, you can run diskutil mount /dev/disk2s2 in Terminal to mount the hard drive. Note that you need to replace disk2s2 with your external hard drive’s identifier. You can click on the hard drive in Disk Utility, and on the Device column on the right pane, you can see the identifier of the hard drive.
A
To fix a corrupted hard drive on your Mac and enable it to store data gain, you need to format it in Disk Utility. But formatting a hard drive will erase everything on it. If you don't want to lose your data, you can use iBoysoft Data Recovery for Mac to rescue files from the corrupted drive first. Then, go to Launchpad > Other > Disk Utility and click the drive on the sidebar, then click Erase to reformat it.