
Written by
Connie Yang
How to Convert HEIC Files to JPG on Mac (2022)
Summary: This post is about how to convert HEIC to JPG for free with applications on Mac, including Preview, Photos, and Automator. And the differences between HEIC and JPG are also noted for your information.

If you have an iPhone, the photos you take are always saved in HEIC format by default. However, HEIC images are not compatible with Windows and some websites. You need to convert your HEIC files to JPG, a popular image file format having high compatibility.
Here are three common ways to convert HEIC images to JPG format on Mac.
- 1. Convert HEIC to JPG on Mac with Preview
- 2. Convert HEIC to JPG on Mac with Photos
- 3. Convert HEIC to JPG on Mac with Automator
Table of Contents:
- 1. Convert HEIC to JPG on Mac with Preview
- 2. Convert HEIC to JPG on Mac with Photos
- 3. Convert HEIC to JPG on Mac with Automator
- 4. HEIC vs JPG
Convert HEIC to JPG on Mac with Preview
The built-in Preview application of macOS enables you to convert your HEIC images to JPG via an easy operation.
Please follow the steps below:
- Open your HEIC photo in Preview. You can bulk open the HEIC photos to convert them to JPG at a time.
- Select File > Export from the Preview menu bar on the top left corner of your screen.

- Choose JPEG from the Format dropdown window. You can move the Quality slider to set your desired compression level. (The higher quality lead to greater image size)
- Rename the file name in Export As: filed and choose a file location in the Where: box.
Now, you get the JPG formatted images. If Preview not working on your Mac, try the below methods to convert the HEIC images to JPGs.
Convert HEIC to JPG on Mac with Photos
If you've transferred HEIC images from your iPhone to the Photos on your Mac, drag them to your Desktop or any other folder on Mac. These HEIC images will automatically convert to JPG ones.
Or, you can convert the HEIC images to JPGs with the steps below:
- Open Photos and select one or more HEIC images.
- Select File > Export > Export "the number" Photos.
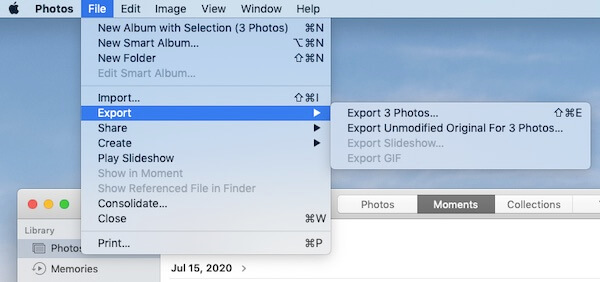
- Choose JPEG in Photo Kind: and set a file name if you want.
- Click Export.
Convert HEIC to JPG on Mac with Automator
Automator is a tool on Mac that allows you to set custom workflows to perform tasks, including converting the file format.
It is a little complex to use Automator to create a workflow for converting HEIC files to JPGs. But we list steps for you:
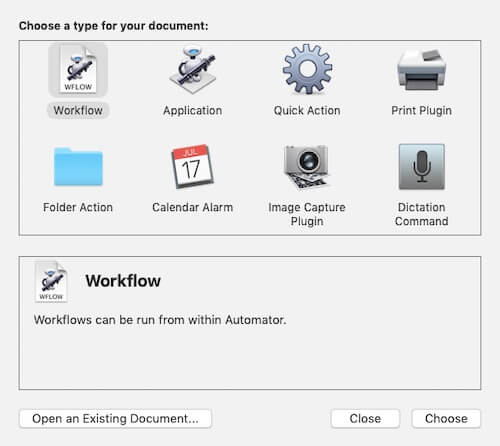
- Open Finder > Applications > Automator.
- Select either Quick Action or Service and click Choose.
- Click Workflow receives current on the pane and select 'image files' on the dropdown menu.
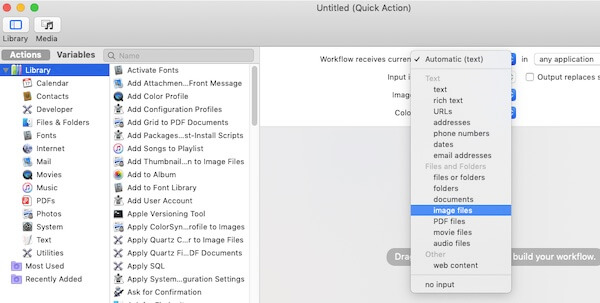
- Choose Actions > Library > Photos on the left sidebar of the window.
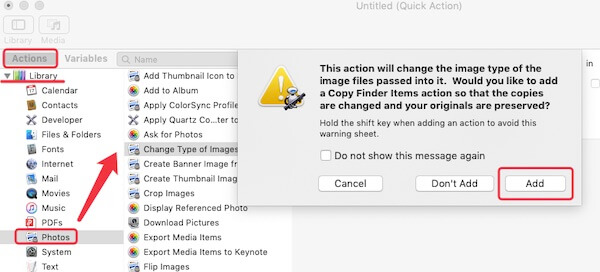
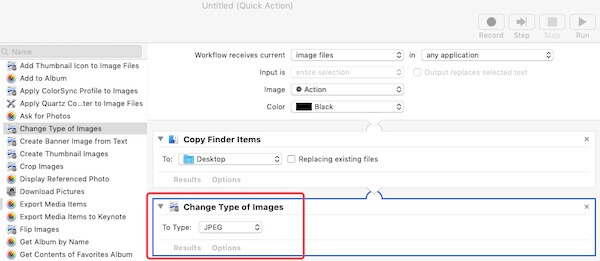
- Find the Change Type of Images action and drag it to the area that says 'Drag actions or files to build your workflow'.
- Click Add when the confirmation alert pops up as below.
- Change the image type to JPEG in the Change Type of Images field.
- Open File in the Apple menu bar on the top left corner of your Mac. Then, choose Export. Name your workflow and choose a destination for it, and then, click Save.
- Double-click the workflow you've just saved. Click Install when asked if you want to install it.
Now, you can get down to convert your HEIC images to JPGs from Finder.
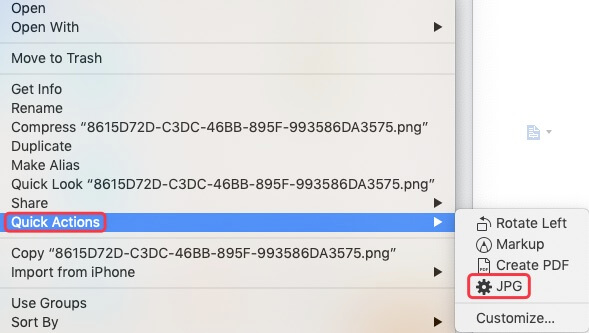
- Select your HEIC images in Finder and right-click them.
- Choose Quick Actions or Services from the menu. Then, select the gear icon with JPG.
The converted JPG image will be saved as the same location of the workflow that you've created just now.
HEIC vs JPG
Apple started to use HEIC (High Efficiency Image Container) as the default image format from iPhones with iOS 11 and above. It is derived from HEIF (High Efficiency Image File Format) developed by the Moving Picture Experts Group.
While JPG (or JPEG) is the most common compressed image format widely used in digital cameras, Mac devices, Windows PCs, and on the Internet.
HEIC images only takes almost half the storage space of JPEGs with the same quality. However, unlike JPG, the HEIC format has poor software and OS compatibility.
What you may be interested in: