
Written by
Connie Yang
How to Downgrade Mac OS: Big Sur to Catalina or Monterey to Big Sur
Summary: This guide tells how to downgrade Mac OS from Big Sur to Catalina or older version in reliable ways. If you have lost files after a macOS downgrade, free download iBoysoft Data Recovery for Mac to get them back.

You may have the question: "Can I downgrade my macOS version?". The answer is definitely yes. This article gives you three ways to downgrade Mac OS without data loss, even if you don't have a time machine backup.
The ways in this article are suitable for downgrading from Big Sur to Catalia, from Monterey to Big Sur, or an older version of macOS.
Here's how to downgrade macOS Monterey, Big Sur, or earlier version:
- 1. Is it necessary to downgrade macOS?
- 2. Back up your Mac first!
- 3. Erase your Mac (Necessary)
- 4. Downgrade Mac OS with a Time Machine backup
- 5. Downgrade Mac OS using Recovery Mode
- 6. Downgrade Mac OS with a bootable installer
- 7. Restore your data after downgrading Mac OS
- 8. How to avoid Mac OS downgrading failure
- 9. FAQs about downgrade Mac OS
Is it necessary to downgrade macOS?
Upgrading to the latest macOS Big Sur requires you to adapt its new features and redesigned look. Moreover, you also have to accept the macOS 11 Big Sur updates issues or the new macOS Monterey problems like software incompatibility and Finder springs back horizontal scrolling.
If you regretted upgrading macOS because of its massive changes and frustrating issues, uninstalling macOS will eliminate your annoyance and bring you a fluency experience. It is also a remedy when "This package is incompatible with this version of macOS" occurs.

Back up your Mac first!
The macOS downgrading process will erase all data on your Mac. Thus, you need to back up your Mac in advance.
If you only have a few files, copy them to an external drive as a backup. If you want to back up all data on your Mac, you can synchronize it to your iCloud if there's enough storage space. Or, you can back up your Mac files with Time Machine for restoring after rollback the macOS update.
Notably, macOS reversion will also erase all the passwords you used in the current OS, like passwords for apps and networks.
To save your passwords, you can check in Keychain in iCloud when using it to back up data. Or write down all the accounts and corresponding passwords.
Erase your Mac (Necessary)
After you've backed up your Mac, it's time to wipe all data on your Mac hard drive.
This step is necessary. Why? Because erasing your Mac hard drive is to make room for the older macOS you'll install. If you don't wipe the Mac hard drive, you'll face issues like:
- macOS downgrading failure
- Sluggish performance of your Mac after macOS reversion
Usually, the startup volume erasure task should be taken in macOS Recovery mode. Here's how:
- Restart your Mac and press and hold the Command + Option + Shift + R keys until the Apple logo appears (or the spinning globe) to boot into macOS Recovery mode.
• How to Fix Mac Recovery Mode Not Working - Select Disk Utility. Then, right-click the macOS-Data volume and click Delete APFS Volume.
- Choose the macOS volume and click Erase.
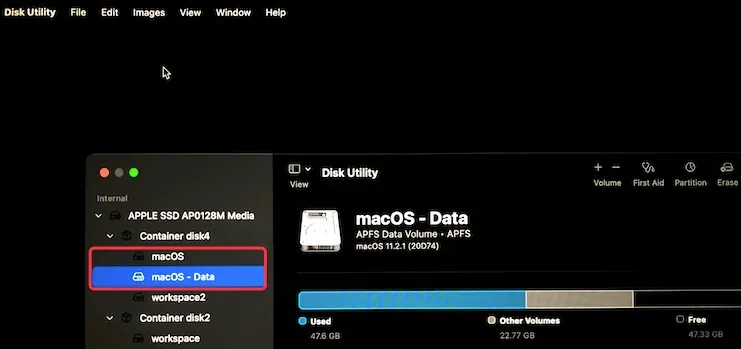
- Set a name, choose APFS in the Format: box. Then, click Erase.
The erasing process will take a while, don't do any other operation during the process, or the internal hard drive may be damaged.
Note: After backing up your Mac and erasing your Mac, you can get down to downgrade from Big Sur to Catalina or from Monterey to Big Sur by one of the following methods. It's up to your situation and preference.
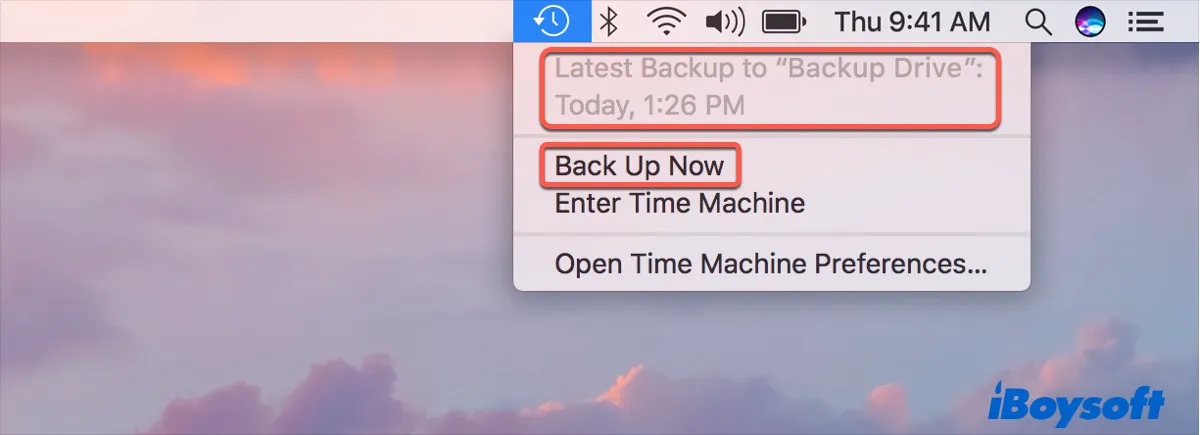
Downgrade Mac OS with a Time Machine backup
If you've backed up your Mac with Time Machine before upgrading to the current macOS version, the macOS downgrade work will become very easy. That's because the backup contains your original macOS installer files.
After the Macintosh HD is erased in macOS Recovery, choose Disk Utility > Quit Disk Utility to return to the macOS Utilities screen.
Then, you can follow the steps to downgrade to Catalina or another version of macOS:
- Connect your backup drive to your Mac.
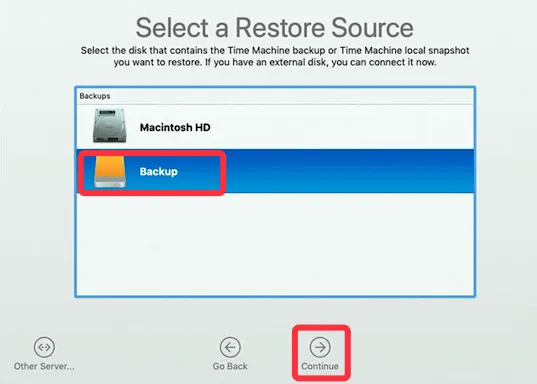
- Select Restore From Time Machine Backup in the macOS Utilities screen and click Continue.
- Select the backup disk and click Continue.
- Choose the destination (typically your Mac's internal hard drive) to save your Time Machine backup.
- Click Restore to retrieve the backup (including the macOS you want to downgrade to and your personal data).
The restoring process will take some time. You can watch TV till the process is done. Then, your Mac mini or another model will automatically restart running macOS Catalina or the other macOS you've rolled back.
Downgrade Mac OS using Recovery Mode
However, if you have no Time Machine backup, how to downgrade macOS?
You can boot your Mac into Recovery Mode to revert macOS. This method is suitable for any Mac model at any age to downgrade macOS without a Time Machine backup.
There's one thing you should pay attention to - check if the macOS you want to downgrade to like Catalina is initially shipped with your Mac.
If yes, please follow these steps to downgrade macOS:
- Connect your Mac to the network and restart your Mac while holding Shift + Option + Command + R keys.
- Release the keys until seeing the spinning globe.
- Select the Reinstall macOS option in the macOS Utilities window.
- Follow the instructions to install macOS Catalina.
Note: If you have an Apple M1 Mac, you can't revert it from macOS Big Sur to Catalina or another earlier version of macOS because Big Sur is delivered originally.
If you're uncertain about that or your Mac came with the macOS that is older than the version of macOS you want to downgrade to, you can follow the above steps to downgrade your Mac to the shipped macOS first. Then, upgrade the Mac to macOS Catalina or any version of macOS you want.
- Click the Apple logo and select Mac App Store.
- Download macOS Catalina installation files from App Store. (You can also search for other macOS versions from apps.apple.com and download the desired one from App Store.)
- Follow the on-screen instructions to install your desired macOS.
Downgrade Mac OS with a bootable installer
If you have some trouble with the above two ways, you can try to downgrade macOS Monterey or Big Sur via creating a bootable installer.
Step 1: Change security settings
As a Mac with an Apple T2 security chip doesn't allow starting up from an external drive by default, you should alter the security setting before creating the bootable installer.
- Check if your Mac with Apple T2 chip in the Apple menu > About This Mac.
- If it has, boot into macOS Recovery mode.
- Select Utilities > Startup Security Utility.
- Check Allow booting from external media.
Step 2: Create a macOS Catalina or older bootable installer
Then, restart your Mac, and go ahead to create a bootable installer.
Note that if you had erased your Mac when trying the above two ways to downgrade from Big Sur, you need to create the bootable installer on another healthy Mac.
- Prepare an external drive with no less than 14GB in size.
- Erase the external hard drive to APFS in Disk Utility app (If it is, you can skip this step).
- Download macOS Catalina or your desired installation files from the App store. (Don't allow the install process starting at this time).
Warning: The Mac operating system download process will take a while. During the process, confirm that your monitor is on, the internet is connected, and the Mac is charged.
- Connect your APFS formatted external drive to your Mac.
- Open Finder > Applications > Utilities > Terminal.
- Enter the following command and press Return. Here "MyVolume" in the command means where the macOS installation files will be stored, replace "MyVolume" with the name of your external hard drive. sudo /Applications/Install\ macOS\ Catalina.app/Contents/Resources/createinstallmedia --volume /Volumes/MyVolumesudo /Applications/Install\ macOS\ Mojave.app/Contents/Resources/createinstallmedia --volume /Volumes/MyVolume
- Type your admin password when asked and press Return.
- Enter Y when warning you that it will erase the external hard drive and press Return.
- Wait until see the "Copy complete and Done" notification.
Now, you have created a macOS Catalina bootable installer.
Step 3: Use the bootable installer to reinstall Catalina or older on Mac
Please confirm the internet connection is okay. Then, follow these steps to use the bootable installer to reinstall macOS Catalina on your Mac.
- Restart your Mac while holding the Option key until seeing the list of startup disk options.
- Choose the disk with your target macOS installer and click Restart.

Then, wait for your MacBook Air or MacBook Pro reboot from macOS Catalina or another version of macOS.
Restore your data after downgrading Mac OS
After the downgrade from Big Sur to Catalina or from Monterey to Big Sur, the last step is restoring data from the backup you've taken just now.
If you saved the necessary files or folders on an external hard drive, move them to your Mac.
Or, if you have backed up your Mac with Time Machine, you can use the Time Machine backup to restore your Mac with the help of Migration Assistant.
Here's how:
- Connect your external hard drive that contains the Time Machine backup to your Mac.
- Open Finder > Applications > Utilities > Migration Assistant.
- Click Continue and you may be asked to enter your admin password.
- Select From a Mac, Time Machine backup, or startup disk and click Continue.
- Select the drive that includes your backups and click Continue.
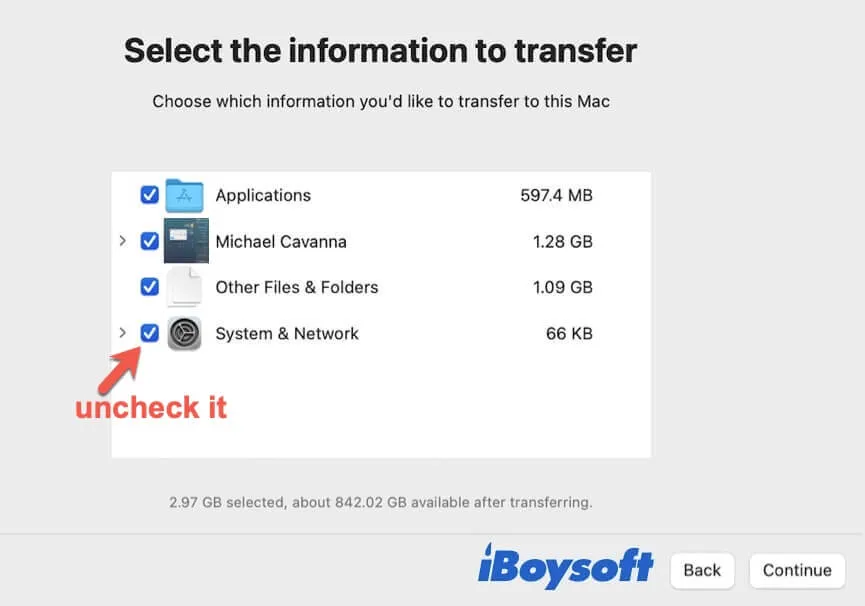
- Choose the latest backup that contains files before downgrading to Catalina and click Continue.
- Check in the information you want to transfer to the Mac. Remember to uncheck the System & Network option to avoid restoring the macOS Big Sur or Monterey files, which will make your Mac back to macOS Big Sur or Monterey.
However, if your backup hard drive is lost or not working, you can get help from iBoysoft Data Recovery for Mac. This Mac Data Recovery focuses on recovering lost files, documents, folders, etc.
How to avoid Mac OS downgrading failure
Reversing macOS is a complicated task. If one of the steps to downgrade macOS goes wrong, you'll fail to roll back to the previous macOS version you want.
Here're some tips to avoid macOS reversion failure:
Remember to erase your Mac. Once you've backed up your Mac, go to macOS Recovery to erase the Macintosh HD or macOS volume where your current macOS stores. Besides, delete the Macintosh HD - Data or macOS - Data volume to completely clean up your startup disk and make room for the upcoming older macOS.
Keep your Mac connecting to the power when downgrading macOS. When your Mac is reinstalling the older macOS, a power outage will cause the macOS installer to corrupt and consequently, Mac OS downgrading failure. You should keep your Mac being charged until the process is done.
Follow every step for downgrading macOS carefully. Whatever the way you choose to downgrade macOS, please follow every step carefully and do not arbitrarily change the order of the steps.
Final thoughts
As we know, downgrading Mac OS is not an easy task and will cause data loss. However, this post offers a complete guide to downgrading macOS Big Sur or Monterey in steps, enabling you to have the biggest chance to go back to macOS Catalina or other versions without data loss.
FAQs about downgrade Mac OS
A
You can access support.apple.com and search for any older macOS version like Catalina, Mojave, High Sierra and then download it.
A
You can press the Command + Shift + Option + R keys while restarting your Mac to enter into Recovery Mode. Then, click the Reinstall macOS utility to downgrade macOS to the version that came with your Mac. Or, you can also create a bootable installer to downgrade your Mac.
A
You can remove macOS Big Sur from your Mac and reinstall another macOS version. Before removing Big Sur, you need to back up files on your Mac. Then, you can erase the boot disk in macOS Recovery and then reinstall macOS Catalina or another version.
A
Yes. To avoid data loss, you need to back up your Mac with Time Machine or synchronize your data to your iCloud drive. After you finish the macOS downgrading process, you can restore your files.
A
First, back up the important or all files on your Mac with Time Machine or iCloud. Then, if your Mac is delivered with Mojave or High Sierra, press the Shift + Option + Command + R keys to boot your Mac in macOS Recovery mode and select Reinstall macOS. This will help you roll back your Mac operating system version to the one shipped with your Mac.
Or, if you've backed up your Mac before upgrading from Mojave or High Sierra to Big Sur, you can use the backup to revert to the initial macOS version.