
Written by
Vain Rowe
A Full guide: transfer the iTunes library from your Mac to a new computer
Summary: Guide to transferring iTunes library to a new computer - from Mac to a Windows computer or another Mac. Also, it tells how to move the iTunes library to an external hard drive. - from iBoysoft
Table of Contents:
- 1. Consolidate all your iTunes files in a single folder
- 2. Move the iTunes folder to your external drive
- 3. Transfer iTunes library to a new computer
- 4. Transfer iTunes library from Mac to a new Mac:
- 5. FAQs about how to transfer the iTunes folder to a new computer
When you purchase a new computer, you must want to copy all the necessary files onto it, including the iTunes files. If you don't know how to transfer the iTunes library from your Mac machine to a new Mac or PC, you are in the right place.
Here, we'll show you how to transfer the iTunes library to a new computer, either a Mac or PC. Then, you can enjoy your saved music, movies, podcasts, or so on your new computer.

How to transfer files from a broken Mac to a new Mac?
This post tells how to transfer files from a broken Mac to a new Mac and fix your broken Mac device. Read more >>
Consolidate all your iTunes files in a single folder
iTunes is a preinstalled app on macOS Mojave or earlier that enables you to play and manage music, movies, or podcasts anywhere on your Mac. That means these files are actually not in the iTunes folder by default.
So, if you need to move the iTunes library to a Mac or PC, you need to copy all of your files into a single folder first.
- Open iTunes on your computer.
- Click the File option on the top navigation bar of your screen and then select Library > Organize Library.
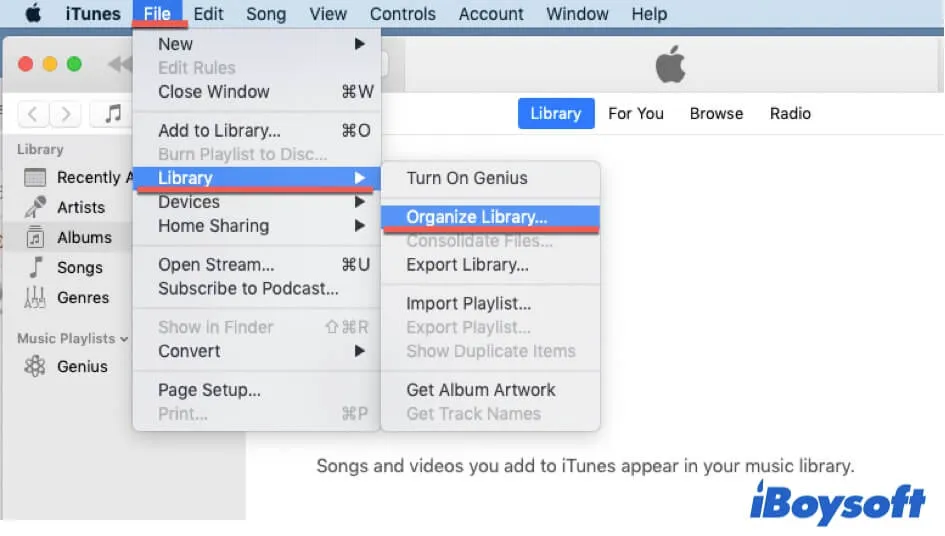
- Tick-market the Consolidate files option on the pop-up box and click OK. That is to create a copy of all your iTunes files into a folder.
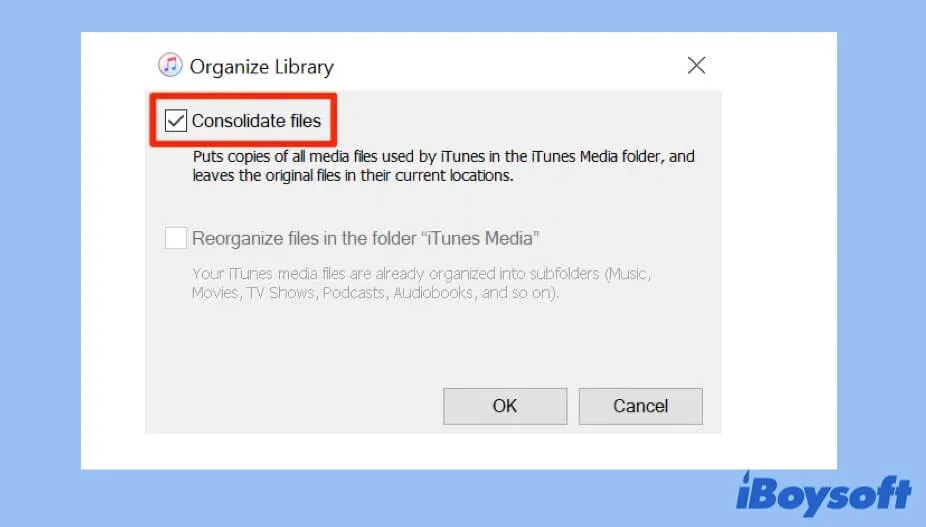
Now, it begins to copy the iTunes library files from other locations on your Mac and consolidate all of them in the iTunes folder. Please wait until this process is done.
Move the iTunes folder to your external drive
When the iTunes library is consolidated, you can get down to copy and paste the iTunes folder to your external drive, such as a USB Flash drive, an external hard drive, etc.
But before doing that, you should know where the iTunes folder locates. By default, the iTunes folder is stored in: /Users/username/Music/iTunes/iTunes Media. You can follow this path to access your iTunes folder and then copy it to your external drive.
Here's how:
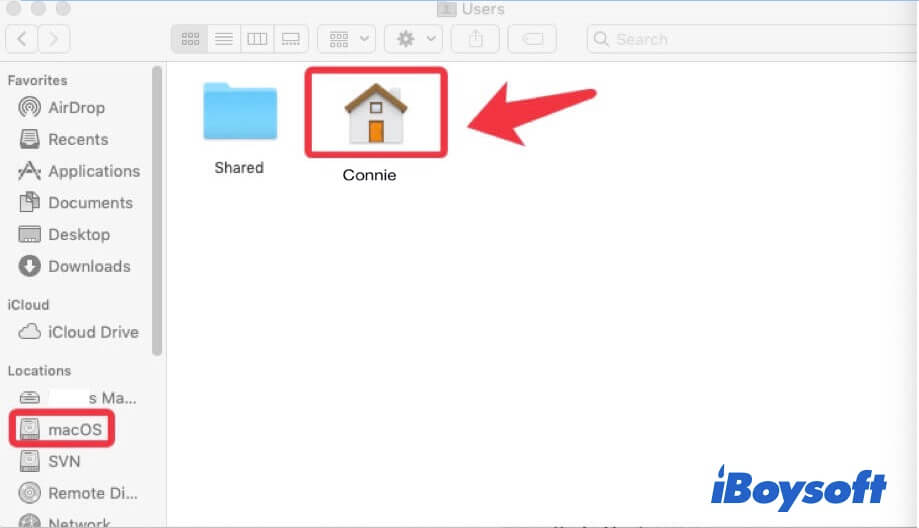
- Open Finder and click the startup volume at the left sidebar under Locations. By default, the startup disk is named macOS.
- Open the Users folder and double-click the house icon labeled with your user name.
- Double-click the Music folder. Then, you'll see your iTunes folder.
- Right-click the iTunes folder and select “copy iTunes”.
- Connect your external drive to your Mac and open it in Finder. Then, right-click anywhere on your external drive and select Paste.
Note: If you want to transfer the iTunes files to a PC, you'd better use an external drive formatted with exFAT or FAT32. That's because FAT file systems are both compatible with Mac OS and Windows. If you are preparing to move iTunes files to a new Mac, the external drive formatted with APFS, exFAT, or FAT32 is compatible.
After that, wait for a moment until your iTunes folder is transferred to your external drive.
If you have changed the original location of the iTunes folder and forgotten it, you can follow these steps to check its location:
- Launch iTunes and select the iTunes option from the top Apple menu bar.
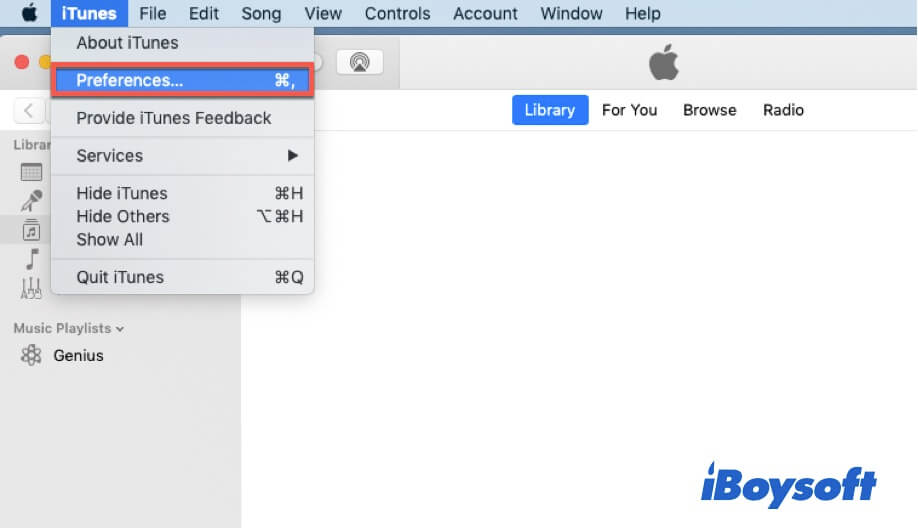
- Choose Preferences from the iTunes drop-down menu.
- Click the Advanced tab on the window. Then, you can check where your iTunes Media folder is stored.
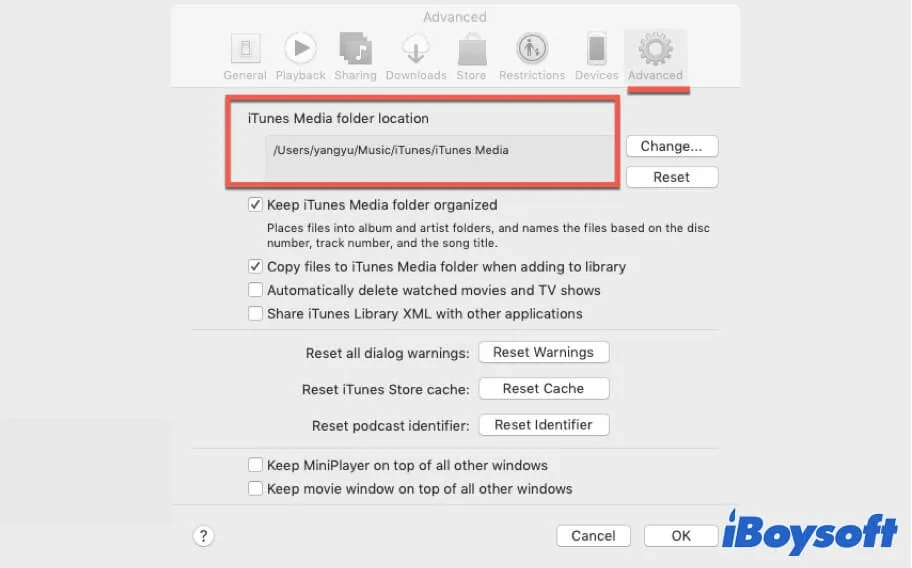
Then, follow the path to find the iTunes folder and copy and paste it to your external drive.
Transfer iTunes library to a new computer
As your iTunes library is copied onto your external drive, you can connect the external drive to your new Mac or Windows computer. Then, give some time for it to be detected and recognized by the computer.
Transfer iTunes library from Mac to PC:
- Close the iTunes app on your PC if it's opened.
- Open the external drive that contains the iTunes folder in File Explorer.
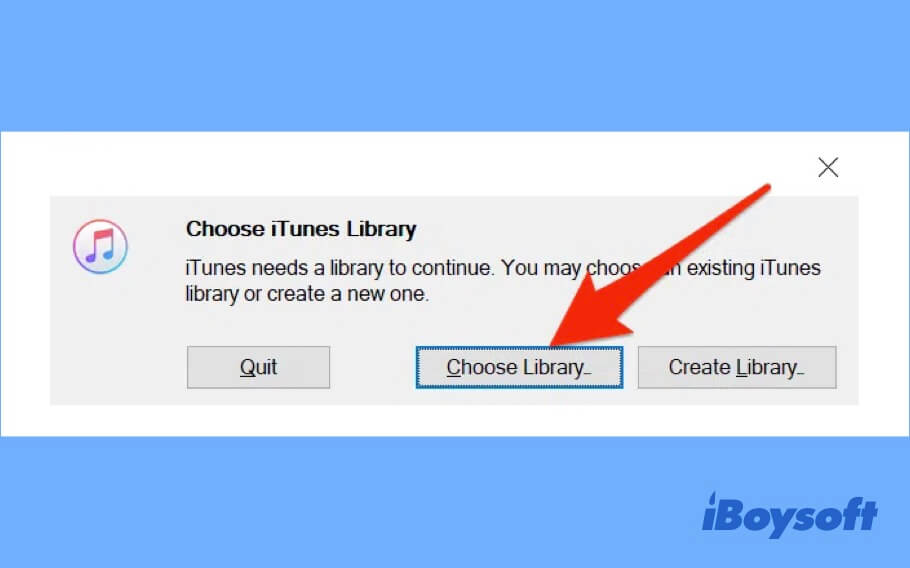
- Copy and paste your iTunes folder to the folder on your PC under this path: C:
\Users\Username\Music\iTunes\iTunes Media. Or, you can drag the iTunes folder there. - Select Choose Library if a pop-up asks you to choose an existing library or create a new one.
Transfer iTunes library from Mac to a new Mac:
- Close the iTunes app on your new Mac if it is launched.
- Open Finder and select the external drive from the left sidebar.
- Drag or copy and paste the iTunes folder to the folder on your new Mac under this path: /Users/username/Music/iTunes/iTunes Media.
- Select Choose Library if it asks you either choose an existing library or create a new one.
Now, let the iTunes folder be transferred from the external drive to your PC or new Mac machine. Then, you'll find all the music, movies, and other files in the iTunes folder on the older Mac that are moved to your new computer.
Final words
Transferring the iTunes folder to a new computer is not a complicated task. But there are many details you should pay attention to. This post is a full guide about how to transfer iTunes files to a new computer. You can follow it to make your iTunes folder from your older Mac to a new PC or Mac.
FAQs about how to transfer the iTunes folder to a new computer
A
Yes, you can. You can use the Home Sharing feature of iTunes to share music or movies from the iTunes library of one computer to another with the same household.
A
Maybe you haven't turned on the Sync Library option. You can open iTunes and select iTunes from the top Apple menu bar and click Preferences. Under the General tab of the Preferences window, choose Sync Library and click OK to turn it on. If you don't subscribe to Apple Music or iTunes Match, the Sync Library option is not available.