
Written by
Connie Yang
Top Ways to Transfer Videos from iPhone to Mac in 2023
Summary: If you are looking for ways to transfer videos from iPhone to Mac, this post is offers three wireless ways and two cable ways. - iBoysoft
Thanks to the Apple ecosystem, transferring files between Apple devices has never been this easy. For example, Apple users can seamlessly transfer photos from iPhone to Mac without extra effort. The same works for how to transfer videos from iPhone to Mac.
This post will concentrate on 4 native ways to transfer/import videos from iPhone to Mac. No third-party software is needed. Want to know the easiest way to transfer files from iPhone to Mac? Read on to know more.
Table of Contents:
- 1. Comparison of all ways to transfer videos from iPhone to Mac
- 2. Transfer videos from iPhone to Mac wirelessly via AirDrop
- 3. Transfer videos from iPhone to Mac wirelessly via iCloud
- 4. Transfer videos from iPhone to Mac wirelessly via Mail
- 5. Import videos from iPhone to Mac with a USB cable
- 6. FAQs about how to transfer videos from iPhone to Mac
Comparison of all ways to transfer videos from iPhone to Mac
Although Apple makes it a light task to transfer across multiple Apple devices, there's a difference in the outcome depending on the way you choose, especially when you have large videos to transfer from iPhone to Mac. To save you time, below is a quick comparison of all ways to transfer videos from iPhone to Mac.
AirDrop
- Pros:
- Wireless
- Free
- Cons:
- Have system requirements
iCloud
- Pros:
- Wireless
- Free under 5GB
- Cons:
- Limited 5GB free space
- Pros:
- Wireless
- Free
- Cons:
- A mail setup is required
Photos
- Pros:
- Free
- Import all videos within one click
- Cons:
- A USB cable is required
Image Capture
- Pros:
- Free
- Import all videos within one click
- Cons:
- A USB cable is required
Transfer videos from iPhone to Mac wirelessly via AirDrop
AirDrop might be the first thing that comes into your mind to transfer videos from iPhone to Mac. Indeed, as part of the Mac Continuity feature, you can make use of this Apple built-in function to send your iPhone videos to Mac without spending a penny.
Note: Make sure your iPhone is running iOS 7 or later and your macOS is running OS X Yosemite or later.
Step 1. Join the same Wi-Fi network and turn on Bluetooth on your iPhone and Mac.
Step 2. Turn on AirDrop on both of your devices to prepare for video transfer.
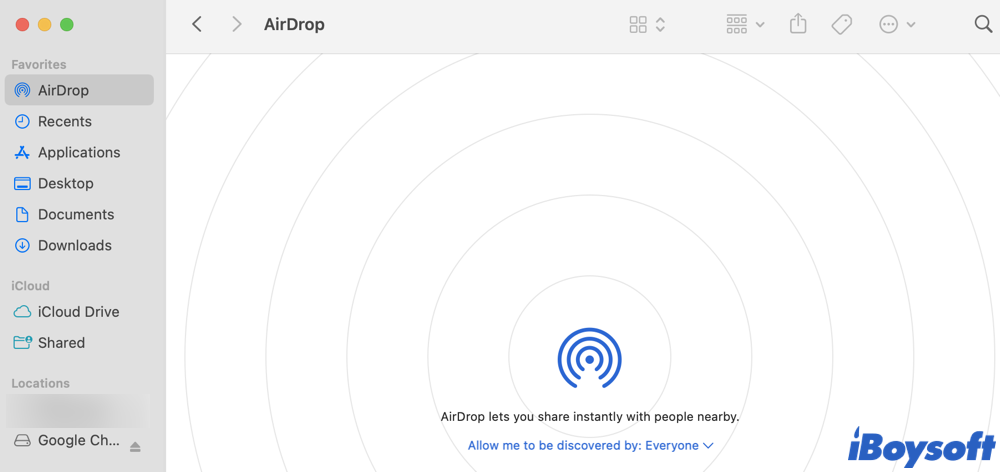
On Mac devices, open Finder and select AirDrop from the left column. Under the signal icon, you can choose to be discovered by Everyone or Contacts Only.
On iPhone devices, go to Settings > General > AirDrop. Choose to be discovered by Everyone or Contacts Only.
Step 3. Open the Photos app on your iPhone. Multi-select the videos you want to transfer from iPhone to Mac. Once done, click on the share button at the bottom left.
Step 4. A share window will pop up. Find your Mac device on the first row and click on it. The drop begins. Or, if you have multiple Mac devices near you, click on the AirDrop icon from the second row of options. Then select the desired destination.

Step 5. On your Mac, an AirDrop message should appear. All received videos are stored in the Downloads folder. However, if your AirDrop is not working, check the article below for effective fixes.
AirDrop Not Working on Mac, iPhone, or iPad, How to Fix?
This article clearly states how to fix AirDrop not working on Mac, iPhone, or iPad, including checking Bluetooth, Wi-Fi, etc. Also, it tells the devices that are compatible with AirDrop.
Read more >>
Is this method working? Share it with your friends!
Transfer videos from iPhone to Mac wirelessly via iCloud
iCloud is another way to transfer videos from iPhone to Mac wirelessly. By enabling iCloud under the same Apple ID, you can sync photos, videos, and any other files on Apple devices such as your iPhone, Mac, and iPad, enabling you to sync iPhone to Mac. However, bear in mind that iCloud only supports 5GB of free space. Hopefully, that would be enough for your videos.
Step 1. Turn on iCloud on your iOS and macOS devices.
On macOS, click on the Apple icon > choose System Preference > select Apple ID. Under the iCloud option, check the box in front of Photos. Enter the admin password if asked.
On iOS, go to Settings > Apple ID > iCloud > Photos > Sync this iPhone to enable iCloud on your iPhone.
Step 2. Wait for iCloud to sync and upload your videos from iPhone to Mac. The time duration depends on how large your videos are.
Step 3. Open Photos on your Mac. Now you should be able to view all iPhone images and clips on your macOS device.
Step 4. To download the videos on your Mac, navigate to icloud.com and sign in to your account.

Step 5. Choose Photos. You should see all photos stored in iCloud. Select the ones you want to save to your Mac and click on the download button.

Step 6. Wait for the download process to be finished. Then check the Downloads folder to find transferred videos from your iPhone to Mac.
Please share this post on your social media.
Transfer videos from iPhone to Mac wirelessly via Mail
Surprisingly, there's one more wireless way to transfer videos from iPhone to Mac, and that is to use the Mail app.
Step 1. On your iOS device, pick up the videos you want to send to your Mac. Then click on the Share button. This time choose the Mail icon.
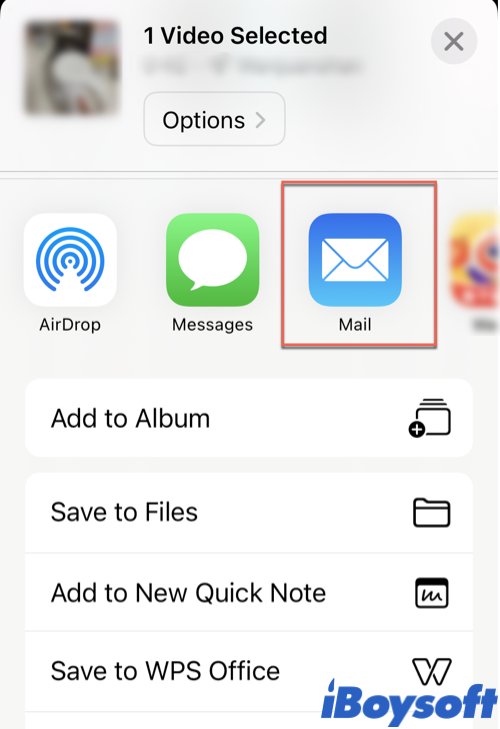
Step 2. Choose one mail account and complete the verification. All selected videos will be sent to your email address.
Step 3. Open the Mail application on your Mac. View and download your videos with ease.
Import videos from iPhone to Mac with a USB cable
With a USB cable, you can transfer videos from iPhone to Mac by making use of two Apple built-in software, Photos and Image Capture.
Import videos from iPhone to Mac via Photos
Step 1. Connect your iPhone to your Mac by plugging in the USB cable on both sides.
Step 2. Launch the Photos app on your Mac. Look at the left sidebar, and click on your iPhone under Devices.
Step 3. On the right window, you can find two options at the top-right corner. Depending on your situation, choose Import All New Videos. Or check your desired videos and choose Import X Selected.
The videos imported from your iPhone to Mac will appear in the Last Import album. Or, you can find the imported videos from Finder > Application > right-click on Photos > Show Package Contents > Masters.
Import videos from iPhone to Mac by using Image Capture
Step 1. Use a USB cable to connect your iPhone and Mac. Launch Image Capture on your Mac once ready.
Step 2. On the left column of Image Capture, find your iOS device under DEVICES.
Step 3. Name your destination folder, then select whether you want to import all photos or certain images.
Find this post helpful? Share it with others!
Conclusion
This post introduces three wireless ways to transfer videos from iPhone to Mac. If you don't mind using a USB cable, you can also import videos from your iOS device to Mac via the Photos and Image Capture apps. Have something new to share? Leave a comment below!
FAQs about how to transfer videos from iPhone to Mac
A
You can use AirDrop to transfer large videos from iPhone to Mac. Turn on AirDrop on both devices and select desired videos on your iPhone. Click the Share button and choose to drop your videos.
A
AirDrop is the easiest way to transfer videos from your iPhone to PC. Without downloading extra software or using other peripherals, you can transfer files between Apple devices wirelessly.
A
You can transfer videos from iPhone to Mac wirelessly in three ways, including using AirDrop, iCloud, and Mail.
A
Yes, you can share videos and other files from iPhone to Mac in multiple ways, including making use of AirDrop, iCloud, Mail, Photos, and Image Capture.